Advertising
{Partner: Brother // Information about advertising at my fairy dust}
The #DIYYearChallenge, which I organize every month with Laura from trytrytry, continues! Our topic today is “Hocus Pocus” – so Laura and I each implemented a creative idea around Halloween.
Our sponsor of the #DIYYearChallenge in October is Brother. Brother once again used the smart labeling device P-touch CUBE Plus – this allows you to individually label tapes and labels using an app. It’s so great to add a personal touch to all sorts of ideas.
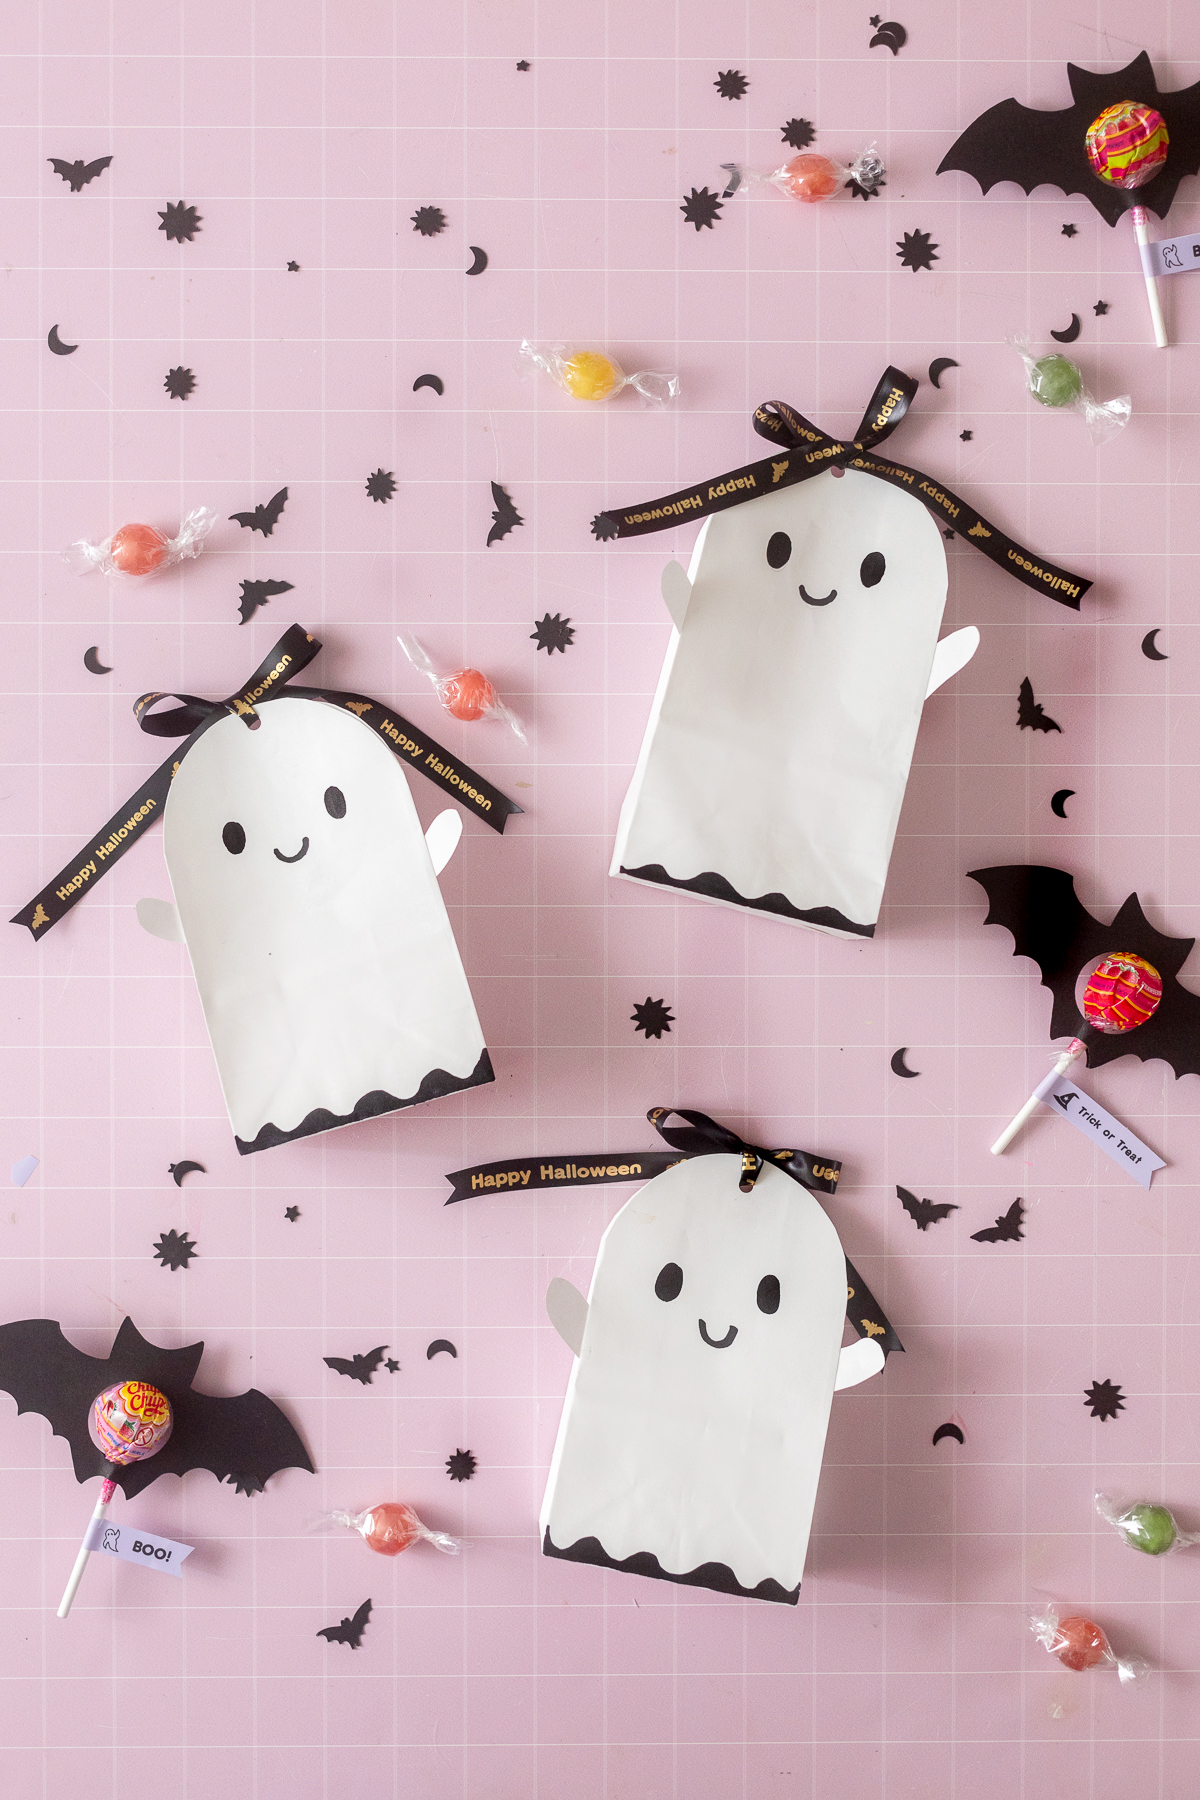
For our challenge topic “Hocus Pocus,” I came up with two ideas for Halloween candy. There are always a lot of small groups of ghosts on our street on Halloween and I thought special Halloween sweets would be something! But the ideas are also perfect for a Halloween party as table decorations and small giveaways or souvenirs: I have Bat lollipops (with a free template for you!) and small ones Ghost candy bags implemented for Halloween.


ABOUT THE DIYYEARCHALLENGE
Every month Laura from trytrytry and Lisa from meinfeenstaub take on a new DIY challenge on a given topic with the #DIYYearChallenge. Our monthly sponsor sends us the same material – and everyone comes up with a DIY idea using the same material – the community then votes on who wins and who implemented the topic better!
Every month you can win the DIY pack we got creative with by voting on Instagram for who wins. It’s definitely worth checking out Instagram, because today you can win the P-touch CUBE Plus from Brother – great, right?
There you can always find our ideas as a DIY video.

About Brother & the P-touch Cube Plus
The P-touch CUBE Plus is a smart labeling device – you can connect it to your smartphone via a Bluetooth interface. This includes an app in which you can then enter the lettering that you would like to print. You can have the font printed on textile ribbons, iron-on tapes or self-adhesive labels.
You can see the labels here in purple on the lollipops and the textile ribbons in black and gold on the little ghosts:

This is how it works:
1. Equip yourself with a tape cassette of your choice (textile tape, labels or iron-on tape). The tape cassettes are available in many different colors.
2. The tape cassette is inserted into the P-touch CUBE Plus. Then open the associated app (“Design & Print 2”) on your smartphone and enter your text. Here you can choose between different fonts and adjust the font size. Optionally, you can also add icons and frames. There are a lot of symbols – for example, I chose Halloween symbols for my projects.
You can then enter whether the tape should be printed once or multiple times. It is also possible to have the tapes cut automatically by the P-touch CUBE Plus.
3. Then click on “Print” and your individual label tape will be printed!


The P-touch CUBE Plus can print tapes and labels with a width of up to 24mm.
On this Brother page you can find more information about the P-touch CUBE Plus and the matching label tapes.

Now you know how the P-touch CUBE Plus works – and now I’ll show you how you can implement the Halloween craft idea yourself. Let’s start with the DIY ghost candy bags.
DIY ghost bags for Halloween – here’s how it works:

The links are partner links. This means that if you purchase the product via this link, I will receive a tiny commission. Nothing changes in price for you!


Step 1: Cut the paper bag
The first step is to cut the top (!) edge of the paper bag into a round shape. You can use a glass or something similar for the round shape – or you can just do it freehand.
Step 2: Paint the bag
Now grab a black marker or felt-tip pen and draw a cute face on the ghost.


Step 3: Cut out the arms and glue them on
If you like, you can cut out little arms for the ghost, which you can then attach to the left and right of the bag with craft glue. I simply used the scraps that were left over from cutting the round shape at the top.
Step 4: Paint wave patterns
You can now draw a wave pattern on the bottom edge of the bag, which you then color in black across the bottom. This looks like the ghost’s fluttering sheet.


Step 5: Punch holes & fill with candy
Now mark a point in the middle of the top edge of the bag, which you then punch with a hole punch. The hole is used to tie the ghost bag with a pretty ribbon.
Before you can tie the bag at the top, fill it with delicious sweets.

Step 6: Design & print the label
Now comes the highlight for the Halloween candy bags: I print an individual label with the P-touch CUBE Plus from Brother. To do this, I insert a black tape cassette with gold writing into the labeling machine.
Next I open the “Design & Print 2” app, which comes with the P-touch CUBE Plus. In it I write my desired lettering (“Happy Halloween”) and add a small bat symbol to match. Then I set in the app that the lettering should be printed 7x on the label tape.

… and the great individual Halloween writing tape is ready! Isn’t that a blast? I’m completely in love! I now use this special writing tape to tie the top of my candy bags.

What I particularly like about this DIY idea is that it’s really easy and quick, but looks really cute. The bags will definitely be a hit on Halloween!


And because it’s so much fun, I have a second sweet DIY project for Halloween candy for you: This is also really quick and easy, but really looks great. I’ll show you how to embellish simple lollipops with bats.
You can either hand out the bat lollipops at the door on Halloween – or use them as table decorations for the Halloween party.
DIY bat lollipops for Halloween – this is how it works:

The links are partner links. This means that if you purchase the product via this link, I will receive a tiny commission. Nothing changes in price for you!
You can download the template for free here – click on the image and save the respective image.
The template with the black outline is intended to be printed out so that you can use it as a template for cutting out.
You can load the template, which is filled in black, into your plotter software.
Make sure you scale the template so that the size fits your lollipops well – I used a width of 14 cm.

The templates are intended exclusively for private use; commercial use is excluded.


Step 1: Transfer template & cut out
For the bat lollipops you always need two copies of the bat made of black paper. You can have them cut out using your plotter – or you can print out the template as a template and cut it out twice with scissors.


Step 2: Glue bats around the lollipop
In the next step, glue the bats around the lollipop so that the lollipop looks through the hole in the middle. Use craft glue and press the two sides of the bat together well.


Step 3: Decorate the bat with a label
Here too, a special highlight is a label tape that I print out with the P-touch CUBE Plus. This time I decided to use a self-adhesive label that I stuck around the stick of the lollipop.
To do this, I insert a tape cassette with self-adhesive labels into the labeling machine. In the “Design & Print 2” app I design suitable lettering, e.g. “Boo!” or “Trick or Treat”.


So that you can stick the label around the stick of the lollipop, you can either print out the lettering twice in a row, or you can add a few spaces so that the label is longer.

Then the label is simply stuck around the lollipop so that the adhesive sides are on top of each other. If you want, you can cut the ends of the tape into a triangular shape.

Isn’t the result really cute? I especially think the little symbols are great. The bats can be made very quickly and are definitely a great eye-catcher for the Halloween party – or of course for the sweets when small groups of ghosts are at the doors on Halloween.


I think both projects are really cute and can’t decide which one is my favorite. I hope you have fun crafting!


Do you like the DIY idea? Then take them to Pinterest and mark them on one of your pin boards:


I’m Lisa – and I can never sit still. I’ve been blogging about my passions on my fairy dust since 2013: These are great DIY ideas, chic design and very special illustrations. The main thing is homemade! More about me.
Source: meinfeenstaub.com