Advertising
{Partner: Brother // Information about advertising at my fairy dust}
The #DIYYearChallenge, which I organize every month with Laura from trytrytry, continues! Our topic today is – in keeping with the start of the year – “Finally Order”.
Our sponsor of the #DIYYearChallenge in January is Brother. This time, Brother is using the brand new P-touch Aura labeling device – this means you can easily label labels using a keyboard and print them out directly. Perfect for my organizing project today:
Last year I really started machine embroidery. And since then they have Embroidery items with me no fixed place. Back then, I was very motivated to put my embroidery items in small boxes, but the boxes were simply stacked in a corner. As is the case, more and more stuff found its way into and onto the speakers that didn’t belong there. In short: that was one Rams check with stacked boxes.
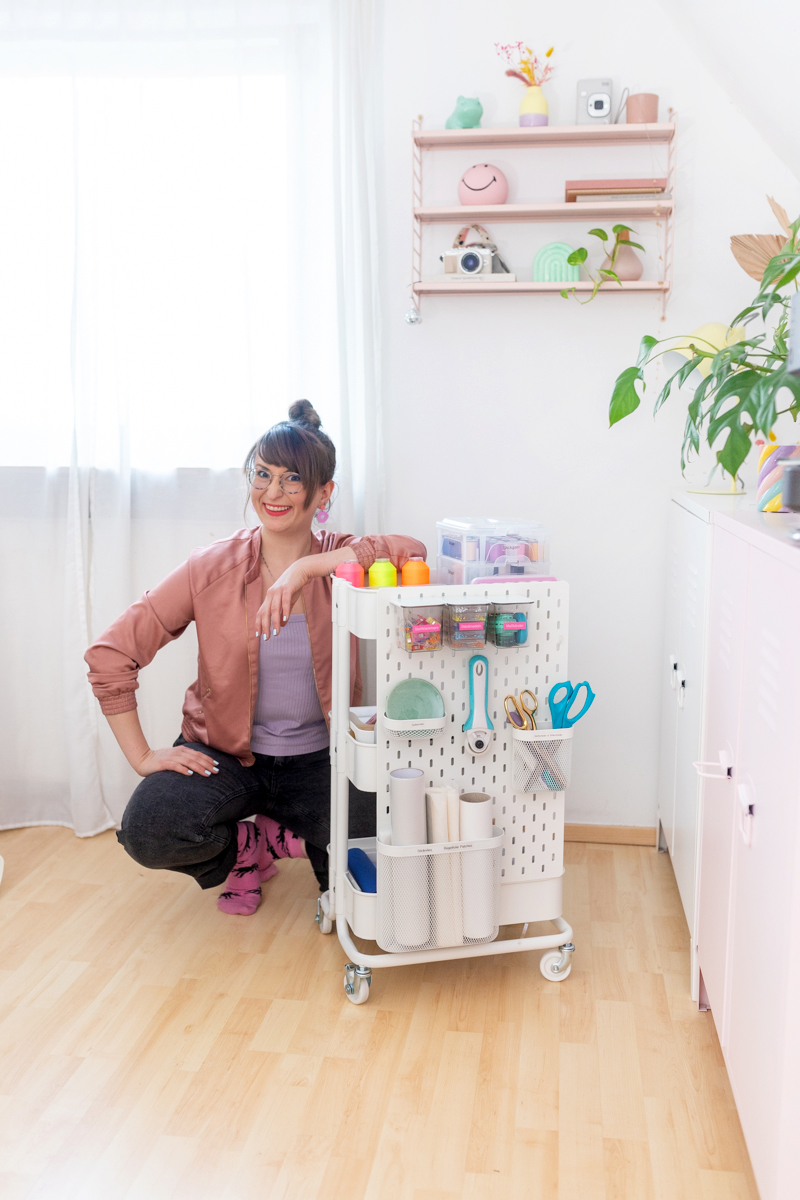
So I always had to dig around to get the things I needed for embroidery. The “Finally order“ The theme of the #DIYYearChallenge is my signal to finally organize my embroidery and sewing basics well. And I immediately had a really good idea: I want to turn a serving trolley into a sewing trolley or embroidery trolley – so that I have everything I need at hand and it is still well stored.
Today I’ll show you how I… five steps I went about it Sewing carriage to put together from the Raskog serving trolley. I will also link the products shown for you.
ABOUT THE DIYYEARCHALLENGE
Every month Laura from trytrytry and Lisa from meinfeenstaub take on a new DIY challenge on a given topic with the #DIYYearChallenge. Our monthly sponsor sends us the same material – and everyone comes up with a DIY idea using the same material – the community then votes on who wins and who implemented the topic better!
Every month you can win the DIY pack we got creative with by voting on Instagram for who wins. It’s definitely worth checking out Instagram, because today you can win the P-touch Aura from Brother – great, right?
There you can always find our ideas as a DIY video.
About Brother & the P-touch Aura
The P-touch Aura is a brand new labeling machine from Brother. You may already know the P-touch CUBE, which I have presented several times. The P-touch Aura is a new cost-effective alternative – perfect if you only need labels.
The small label printer is very easy to use: You insert the label cassette of your choice – they are available in different colors – type the text using the keyboard and press the “Print” button.
There are 3 fonts, 15 frames and 250 icons to choose from to customize your labels.
The P-touch Aura series includes a small handheld model, a desktop model without Bluetooth (you can see that here!) and a handheld model with Bluetooth.
There is a large selection of label tapes to match the “Aura” series – there are 17 different colors. Click here for the labels.
The P-touch Aura is the perfect helper for organization at home.
If you label all the boxes and containers nicely, you’ll know exactly where to find what.
And for me it’s like this: If there’s a label on it somewhere, I’m much more willing to put something back where it needs to be.
When I organize, it also has the effect that I think very carefully about what really has to go in there – and what can actually go away.
In five steps you can create a sewing trolley from a serving trolley
Now I’ll show you how I went about putting together the sewing cart or embroidery cart.
Very important: I want everything in the cart that I want to have quickly at hand when embroidering and sewing.
There is no room for colorful fabrics or the like in the sewing cart; they can also be put in a large box that I take out when I want to choose a fabric.
But I almost always need materials like fabric clips, scissors, measuring tape, seam rippers, etc. when sewing and embroidering – so I want to have them on hand quickly.
This is exactly what I keep in mind when I plan the sewing cart: What do I often need? What do I want to have on hand quickly? And what can disappear in a box in a closet?

Step 1: Clear everything out
“It always gets worse before it gets better” There is little that fits better than tidying up. In the first step, I emptied all the boxes with sewing and embroidery materials.
Then I sat down in the middle of the chaos, cursed Past Lisa briefly and exhaled in exasperation. That moment when you sit in the middle of the chaos and know “This is going to be tiring” is not my favorite moment. But I know it’s worth it.
Past-Lisa had really great ideas: For example, a box filled with seam rippers, a ballpoint pen, a clothing label and part of an eyelet pliers. Uh, yes. But we want to change that.

Step 2: Plan and sort materials
In the next step I started grouping and sorting the items. Before, I was convinced that I didn’t have a seam ripper. Wrong, obviously I have four. There is now no shortage of tape measures either.
Now I’ve also thought about what should go into the sewing cart.
For this I asked myself the following question: “What do I always need when sewing/embroidering and need to have it quickly to hand?”
That was also the moment when, for example, belt straps or buckles were rejected by me as a sewing cart bouncer. I definitely don’t always need them.
Step 3: Sort into boxes
Next is sorting into boxes and containers. To be honest, I bought a few boxes at random without planning it exactly – and I still had some at home.
But you now benefit from the fact that I can show you exactly which boxes I used.
I deliberately didn’t use boxes with lids for sewing needles, seam rippers etc. so that I could get them quickly. That’s why the boxes in the car don’t have to be transparent, as I can see the contents from above anyway.
If you want to stack the boxes in the car, transparent boxes with lids are ideal.
I used screw boxes from the hardware store for my sewing thread – very practical: two rows of thread spools fit in here.

Products shown:
– the yellow box is a screw box from the hardware store
I used two “S-hooks” to hang a perforated plate on the long side of the sewing cart, which I then filled with baskets and containers. I particularly like the wide basket at the bottom in which I put the embroidery stabilizer and iron-on foil.
I need both of these a lot when embroidering, so it’s great to have them right at hand.


Step 4: Label & label
Then comes the best part, labeling and labeling. I actually labeled all the containers and boxes so that I don’t have to spend a lot of time looking for where things are.
It also works so much better that I put things back where they belong.

I used the P-touch Aura labeling device to label the containers and boxes. I used labels in pink with white font and transparent with black font.

Step 5: Put away
Once everything is labeled, it’s time to put it away! There are certainly endless possibilities as to how you can equip such a sewing or embroidery cart. You could also attach perforated plates to the serving trolley from several sides and attach many more hanging containers. For me it fits wonderfully the way I have it fitted.
The most important thing is: Place what you need most often within easy reach.

For example, I find sliding boxes super practical for fabric clips, pins and measuring tapes; I can simply take them out and place them on the table next to the embroidery or sewing machine.
I organized embroidery thread and bobbin thread spools in transparent organizer boxes so that I can directly see the colors that are inside from the outside.

And I have to say, even though cleaning up was really tiring at the beginning: it was really worth it! I’m really happy with my sewing and embroidery cart. It turned out so pretty and is also super practical!

Do you like the DIY idea? Then take them to Pinterest and mark them on one of your pin boards:

I’m Lisa – and I can never sit still. I’ve been blogging about my passions on my fairy dust since 2013: These are great DIY ideas, chic design and very special illustrations. The main thing is homemade! More about me.
Source: meinfeenstaub.com


