Advertising
{Partner: Eberhard Faber // Information about advertising at my fairy dust}
I go on to the #diyyeanarchallenge, which I organize every month with Laura from Trytrytry! We all want to come up with spring – and to match this, our today’s topic is “starting with spring”.
Our sponsor of the #diyyeanarchaallenge in January is Eberhard Faber. We used the modeling mass EFA Plast, the Metallic Marker and the school paint colors for our projects from Eberhard Faber.
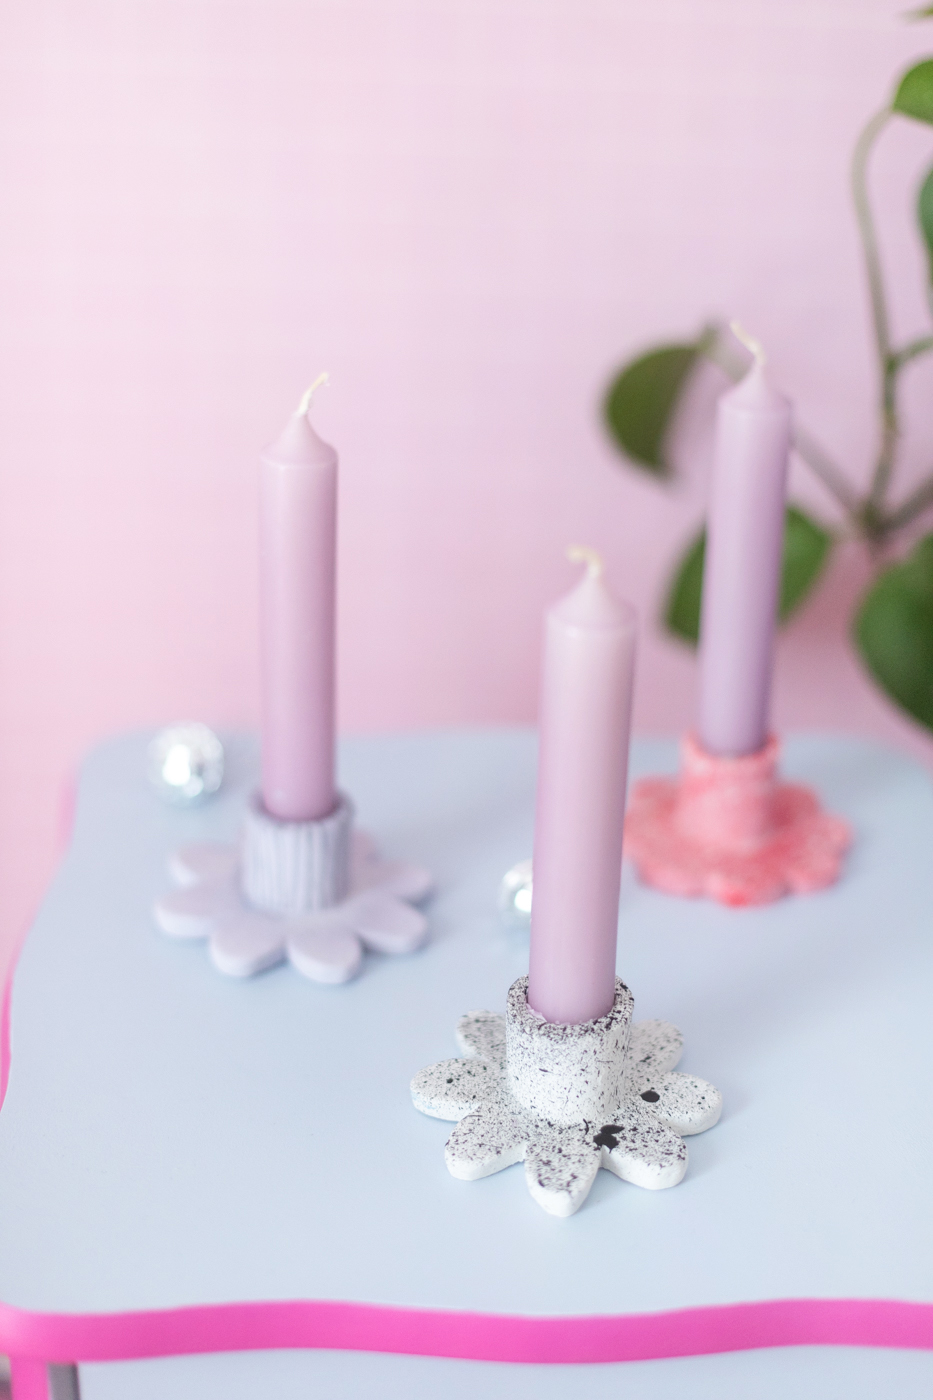
I made cute flower candlesticks from EFA Plast-the flower shape fits perfectly with spring, and the colors just put you in a good mood. I show you how to do – and you can download the template for the flowers for free below.

About the Diyyeanarchallenge
Every month, Laura von Trytrytry and Lisa von Meinfeen dust with the #diyyEARACHALLESGE stand on a new DIY challenge on a given topic. Our monthly sponsor sends us the same material-and each one can come up with a DIY idea from the same material-the community then coordinates who wins and has better implemented the topic!
Every month you can win the DIY package with which we were creative by voting on Instagram who won. It is very worth a look at Instagram, because today there is a set of EFA Plast, Metallic Markern and Schulkbalben.
There you will always find our ideas as a DIY video.
About Eberhard Faber & the products used
There is one by Eberhard Faber Nice set made of EFA Plast modeling mass and metallic markers. This set was used for our projects.
EFA Plast is a modeling mass that dries in the air. When you open the packaging, the mass is soft and smooth – it can be shaped and processed really nicely. Then let your work dry in the air.
The practical thing is: if your work is dry, you can grind it, drill, stick, cut, … and of course paint it.
The set also contains the metallic markers in six colors – you can use them to decorate your EFA Plast works, or of course on glass, paper and other smooth surfaces.

This is how it works: tinker flower candlesticks from modeling compound
By clicking on the picture you can download the template for the flowers for free:
Step 1: Roll out the EFA Plast
In the first step, you roll out the modeling compound with the help of a tool or a smooth bottle. Make sure that you roll out the modeling mass at least 5 mm thick.
Then put the template onto the modeling mass and cut out the flower shape with the help of a knife.

Step 2: Cut candle holders
Roll again a small amount of EFA Plast – it becomes the candlestick. Depending on which candle you use, you cut out a correspondingly long rectangle.
To do this, you measure the scope of the candle, that is the length of the rectangle you cut out. You can set the height yourself, I like to use 2 cm.

Step 3: Connect parts
Now you put the rectangle together on the short side on the cut edges. You can smooth the seam with a modeling tool. Then drizzle the flower with a little water and put the two parts together – candlestick and flower. Here, too, you can smooth the seam on the edge of the candlestick with a modeling tool.

Now let the candle stand dry well – they should dry in the air for at least 24 hours until they have hardened.
Step 4: grinding
Next it goes to grinding. If the candlesticks are completely dry, you can smooth unevenness with sandpaper or a grinding sponge.

Step 5: paint
Now you can paint your candle stand. I mixed different colors with the EFA school paint colors and painted the candlestick.
So that they look particularly chic, I then painted the candlestick with the metallic markers and sprinkled them in a second color.

Now you only let your works dry – and the great homemade candle stands made of modeling compound are ready.

I think the result is so beautiful – either at home as a DIY decoration, but I also like the project as a gift idea. Everyone is really happy about such sweet flower candlelight stands with a suitable candle!

Do you like the DIY idea? Then like to take them on Pinterest and notice them there on one of your pin boards:

I’m Lisa – and I can never sit still. I’ve been blogging about my passions since 2013: these are great DIY ideas, chic design and very special illustrations. The main thing is homemade! More about me.
Source: meinfeenstaub.com


