Advertising
{Partner: Pretty Orange // Information about advertising at mein feenstaub}
Next I go to #DIYYearChallengethat I organize every month with Laura from trytrytry! Our topic today is “Small Greeting”. It’s all about creative ideas for little gifts.
Our sponsor for the month of July is Pretty Orange. Pretty Orange has a wonderful selection of stationery (and gifts!) with great designs that you can personalize yourself in the shop: for birthdays, invitations, weddings and many other occasions.
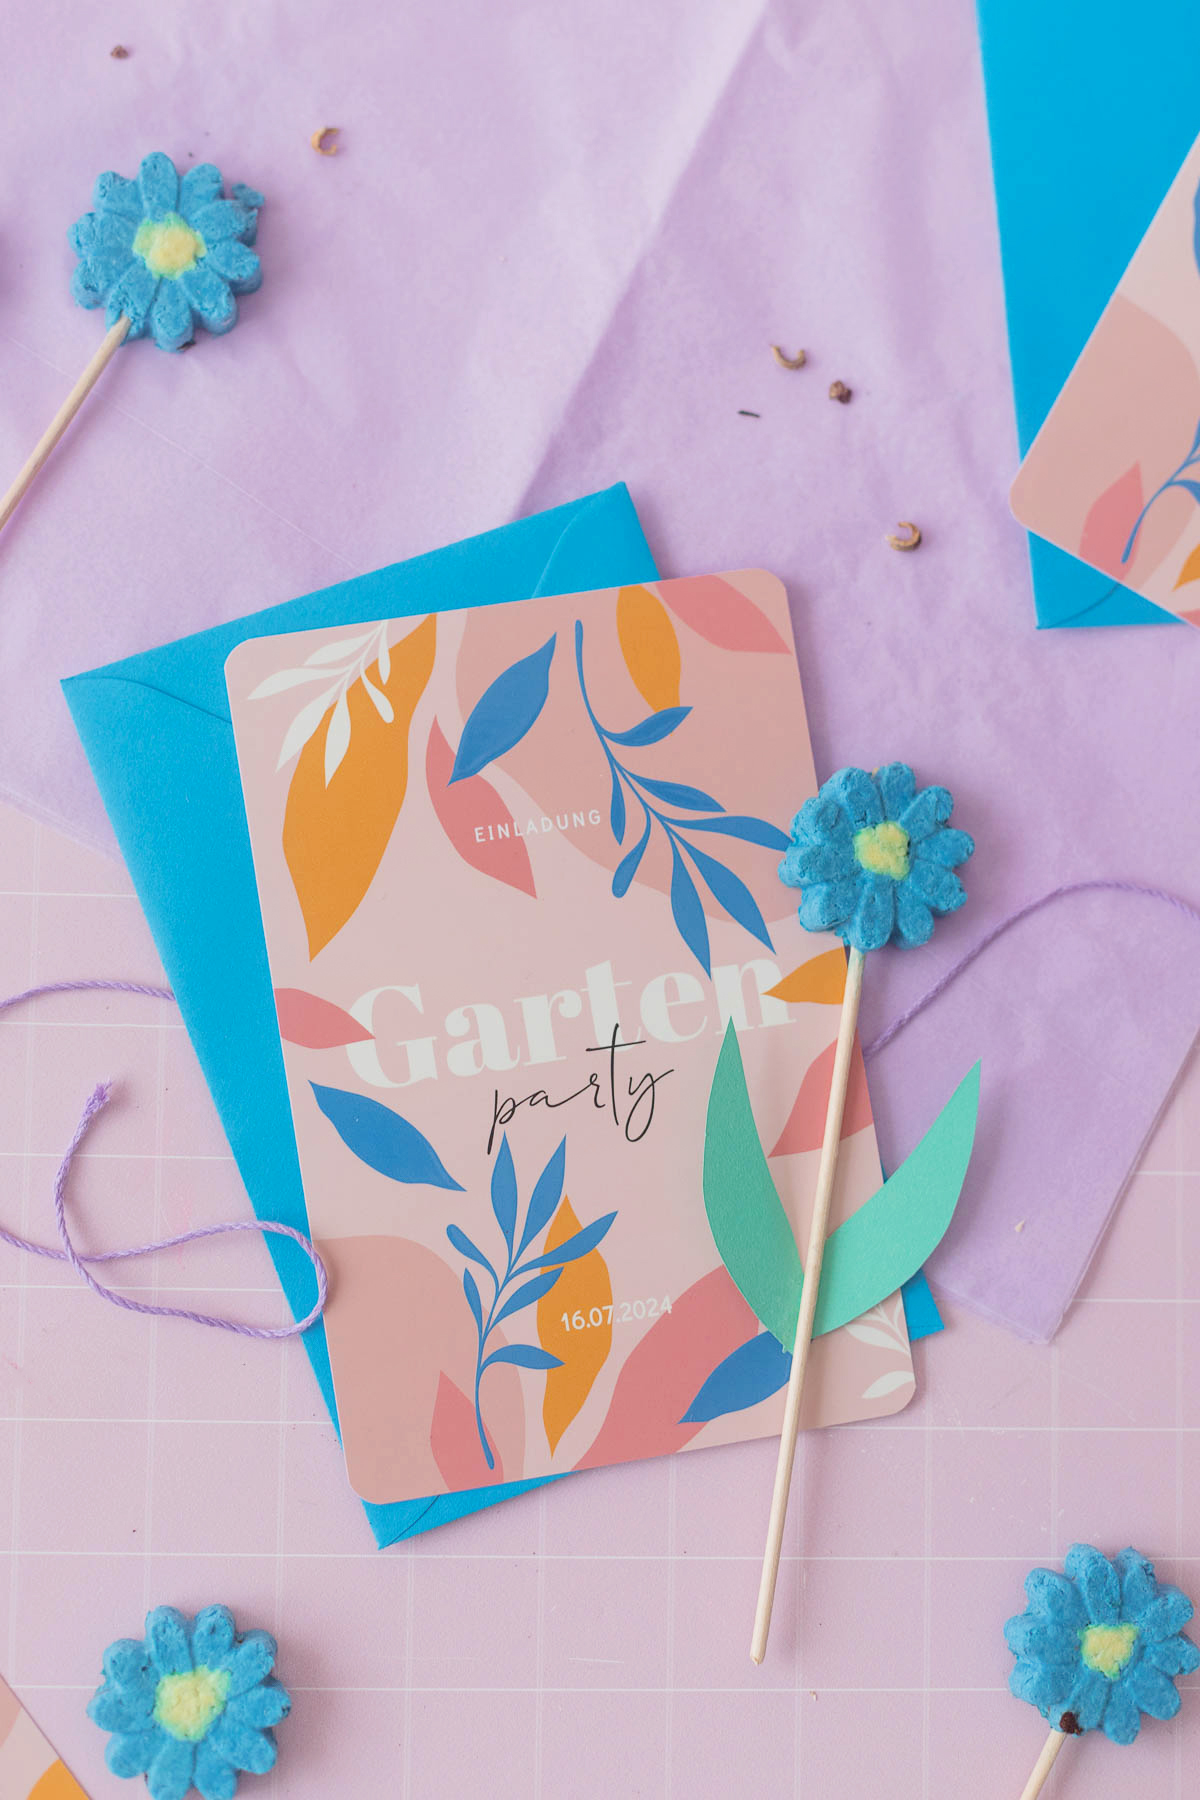
Laura and I decided that we Little things as DIY ideas want to implement with which you cards can make it even more special: In keeping with the theme, I made seed bombs with flower seeds in the shape of flowers, which are great to add to a greeting card or invitation card.
You can then plant the little flowers and enjoy a beautiful bee meadow.
I discovered the beautiful garden party invitation in the Pretty Orange shop. I immediately thought the design was really pretty – exactly my taste!
> Click here for the map
The great thing about Pretty Orange: You can use the Design Editor directly in the shop to change the text, the colors of the elements and the elements themselves completely individualize. So you could also grab the design and write “Happy Birthday” on it – or whatever you want.
There is a huge selection of really beautiful designs.
Once you have finished the design, you can then choose matching envelopes and stickers for the envelopes.

ABOUT OUR PARTNER PRETTY ORANGE
At Pretty Orange you can design and print individual cards for birthdays, invitations and all kinds of occasions.
You simply choose a design and can then personalize it with your own photos and favorite colors, as well as change the fonts and text – so that you get your very own personal design. In addition to cards, there are also individual annual calendars and lots of personalized gifts.
Pretty Orange’s cards are super high quality and really make a statement. The print comes out so beautifully and the colors are absolutely brilliant. There are also many designs with shiny or slightly raised elements.
To match the wonderful card, I made DIY seed bomb flowers, which are great as a small gift to add to a birthday card or invitation.
You can then simply plant the seed bomb flowers and a beautiful flower meadow will grow. I thought that was totally fitting for the “garden party” theme.
ABOUT THE DIYYEARCHALLENGE
Every month, Laura from trytrytry and Lisa from meinfeenstaub take on a new DIY challenge on a given topic with the #DIYYearChallenge. Our monthly sponsor sends us the same material – and each of us comes up with a DIY idea using the same material – the community then votes on who wins and has implemented the topic better!
Every month you can win the DIY package that we were creative with by voting on Instagram to find out who won. It’s definitely worth checking out Instagram because today there are 100 Euro vouchers for Pretty Orange for two people to win.
There you will always find our ideas as a DIY video.
There are so many possibilities for original homemade projects that you can give as gifts with cards. Laura has thought of a great cash gift for the wedding – today I have little seed bomb flowers.

How to make your own seed bomb flowers
- Flower silicone mold
- colored paper in blue and yellow (1 A4 paper is enough for at least 5 flowers)
- Scissors
- Craft glue
- Shish kebab skewers
- Flower seeds
- Hand blender
*The links are affiliate links. This means that I get a tiny commission when you make a purchase, but the price doesn’t change at all for you.
STEP 1: MIX THE PAPER MASS
The first step is to mix the paper pulp. Prepare two bowls for this.
Tear the blue and yellow paper into lots of small pieces and place them separately in bowls. Pour water into the bowls so that the pieces are all submerged in water.
Now let the pieces soak in the water for about 30 minutes until they are well soaked.

Then fill each shredded paper into a tall mixing bowl. Puree the paper shredded paper using a hand blender until it forms a smooth mass. Then fill the shredded paper back into the bowls.
Now use a tea towel to squeeze out the excess water from the paper pulp. The more water there is, the longer the drying time will be.

STEP 2: FILLING THE SILICONE MOLD
In the next step, you form a small ball out of the yellow paper mass and place it in the middle of the flowers in the silicone mold.
Now fill the mold halfway with the blue paper mass. Press it down firmly so that the mold is well filled.

STEP 3: FILL SEEDS INTO THE SILICONE MOLD
Then fill the flower seeds into the silicone mold. Press them a little into the blue paper mass. Now place a skewer in each flower and press it a little into the blue mass.
Then fill the rest of the mold with blue paper pulp. Here, too, you can press down on top with a tea towel to absorb any excess water.

Now repeat this for the other flowers from the silicone mold.
Then let the paper flowers dry in the mold. They need about two days to dry thoroughly.
Then carefully remove the flowers from the mold using the skewers.
Now you can cut out flower petals from green paper and stick them to the wooden skewer if you like.

The small seed bomb flowers go perfectly with Pretty Orange cards. You can give the flowers as a little something with an invitation or greeting card for a special touch.
Do you like the DIY idea? Then take it with you to Pinterest and save it to one of your pinboards:

I’m Lisa – and I can never sit still. I’ve been blogging about my passions on my feenstaub since 2013: great DIY ideas, chic design and very special illustrations. The main thing is that they’re homemade! More about me.
Source: meinfeenstaub.com


