Advertising
{Partner: EILLES COFFEE // Information about advertising at mein feenstaub}
Next I go to #DIYYearChallengethat I organize every month with Laura from trytrytry! Our topic today is “Autumn Magic”Today we want to get in the mood for autumn with our DIY projects, which we hope will be a magical, golden autumn.
Our sponsor in this round is EILLES KAFFEE – because what could be better for autumn than a nice warm cup of coffee on the sofa?
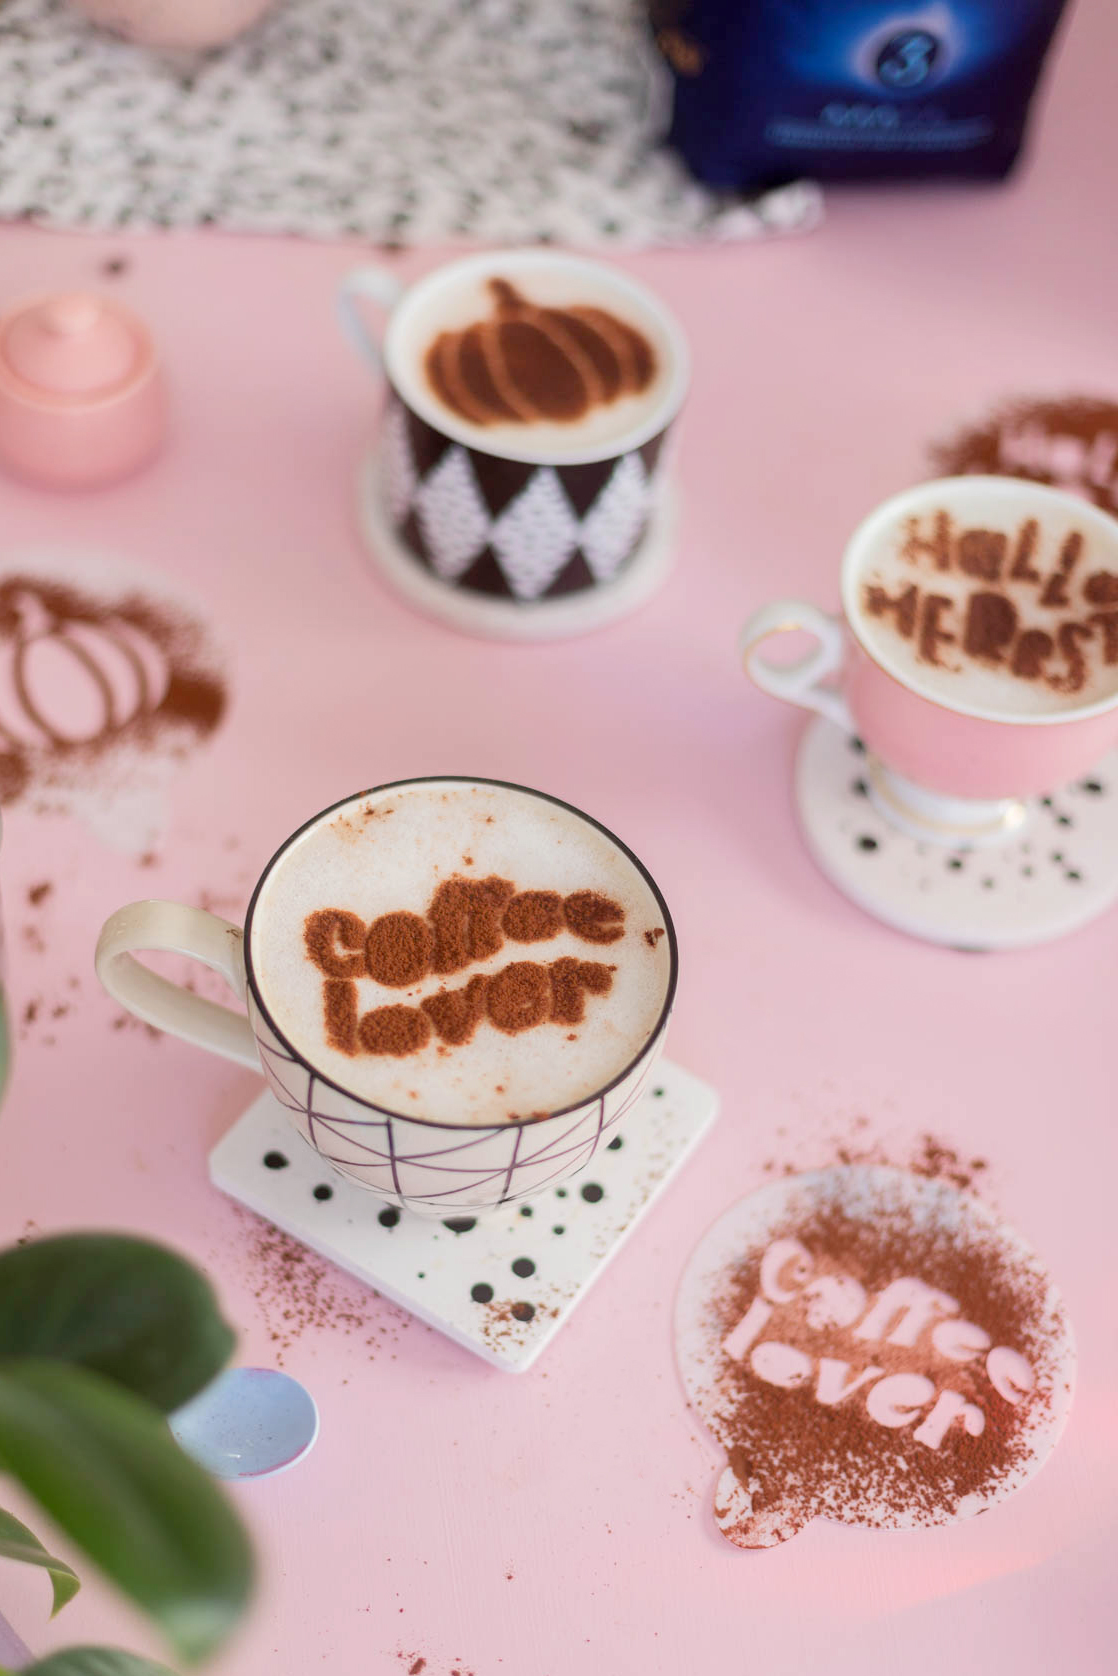
My DIY idea on the theme “Autumn Magic”: I have Coffee stencils designed and cut out by yourself, with which you can bring the café feeling home: you sprinkle cocoa through the stencils onto the milk foam and magical works of art are created. Isn’t that super cool?! I’m really impressed myself.

Now comes the best part: I will not only show you how to make the coffee stencils yourself, but you can also download my Download templates for the stencils for free. I created three versions: a pumpkin, “Hello Autumn” and “Coffee Lovers”.
This allows you to create your very own Coffee artworks conjure up magic – for yourself or for enthusiastic guests. When I sent my brother a photo of my work, he immediately said: “I thought you were in a café?!” Hehe.

ABOUT OUR PARTNER
Our Sponsor EILLES COFFEE has stood for roasting expertise since 1873. EILLES KAFFEE attaches particular importance not only to the careful selection of beans, but also to a perfectly coordinated roasting process.
The delicious coffee varieties are available in whole beans, but also filter coffee and coffee pads. Coffee enjoyment is always the top priority. Every EILLES coffee bean contains the knowledge, experience and work of the EILLES KAFFEE roasting masters. They give the coffee varieties their unique character.
EILLES KAFFEE offers the delicious RÖSTMEISTER Caffè Crema, which is lightly roasted. The Caffè Crema tastes very aromatic and not too sour.
The RÖSTMEISTER espresso beans from EILLES KAFFEE are also delicious: The beans are dark roasted and the espresso tastes intense.
ABOUT THE DIYYEARCHALLENGE
Every month, Laura from trytrytry and Lisa from meinfeenstaub take on a new DIY challenge on a given topic with the #DIYYearChallenge. Our monthly sponsor sends us the same material – and each of us comes up with a DIY idea using the same material – the community then votes on who wins and has implemented the topic better!
Every month you can win the DIY package that we were creative with by voting on Instagram to find out who won. It’s definitely worth checking out Instagram because today you can win a great coffee set from EILLES KAFFEE.
There you will always find our ideas as a DIY video.
I love that our DIY ideas for the DIYYearChallenge are always so different – this time Laura made a coffee scrub. How cool!


How to make your own coffee stencils from foil + free templates
*The links are affiliate links. This means that I get a tiny commission when you make a purchase, but the price doesn’t change at all for you.
You can download the templates for free here – click on the image and save the respective image.
The templates with the black outline are intended to be printed out so that you can use them as templates for the cutter.
You can load the templates that are filled in black into your plotter software.
Make sure you scale the stencils so that the size fits your cups well.


Step 1: Cut out coffee stencils
The first step is to cut out the stencil of your choice. You can either place the template under the stencil film and cut it out by hand with a cutter and scissors – or you can cut it out with your plotter. Both options work.

If you have a Cricut plotter, here is the cutting setting I used:
- I used the acetate film preset and set the Joy to cut 4 passes. This worked very well.
Next, things get exciting – it’s time to transfer the stencils onto the milk foam. There are actually a few things to consider here to make sure it turns out well. But if you know what to look out for, it’s really easy.
First, prepare a delicious cup of coffee – make sure there is enough space at the top for the milk foam. Then pour the milk foam into the cup with the coffee.

Tip 1: Fine milk foam
Make sure that your milk foam is as finely foamed as possible and that there are no large bubbles.
I used “barista” oat milk and the result is very nice.
Tip 2: Distance between template and milk foam
The design will look best if the milk foam reaches right up to the edge of the cup. The smaller the distance between the stencil and the milk foam, the better the design will come out.
Tip 3: Fine cocoa
Now comes the most important tip: the finer the cocoa powder, the better the result. Be sure to use a fine sieve to sprinkle the cocoa powder. If the cocoa is too lumpy, the result will not look good, I speak from experience. I have tried a few things so that you don’t make the same mistakes.
For example, you can use a fine kitchen sieve or a fine cocoa shaker.

To transfer the motif onto the milk foam, place the stencil on the rim of the cup.
Hold the cocoa shaker or sieve directly over the stencil and tap the cocoa shaker from the side with your fingers. When spraying, make sure that the design is completely covered with cocoa powder.
Always work from the same direction and the motif will come out nicely.
And don’t worry: it sounds more complicated than it is! Once you get the hang of it, you’ll be creating amazing coffee works of art one after the other.

Do you like the DIY idea? Then take it with you to Pinterest and save it to one of your pinboards:

I’m Lisa – and I can never sit still. I’ve been blogging about my passions on my feenstaub since 2013: great DIY ideas, chic design and very special illustrations. The main thing is that they’re homemade! More about me.
Source: meinfeenstaub.com


