
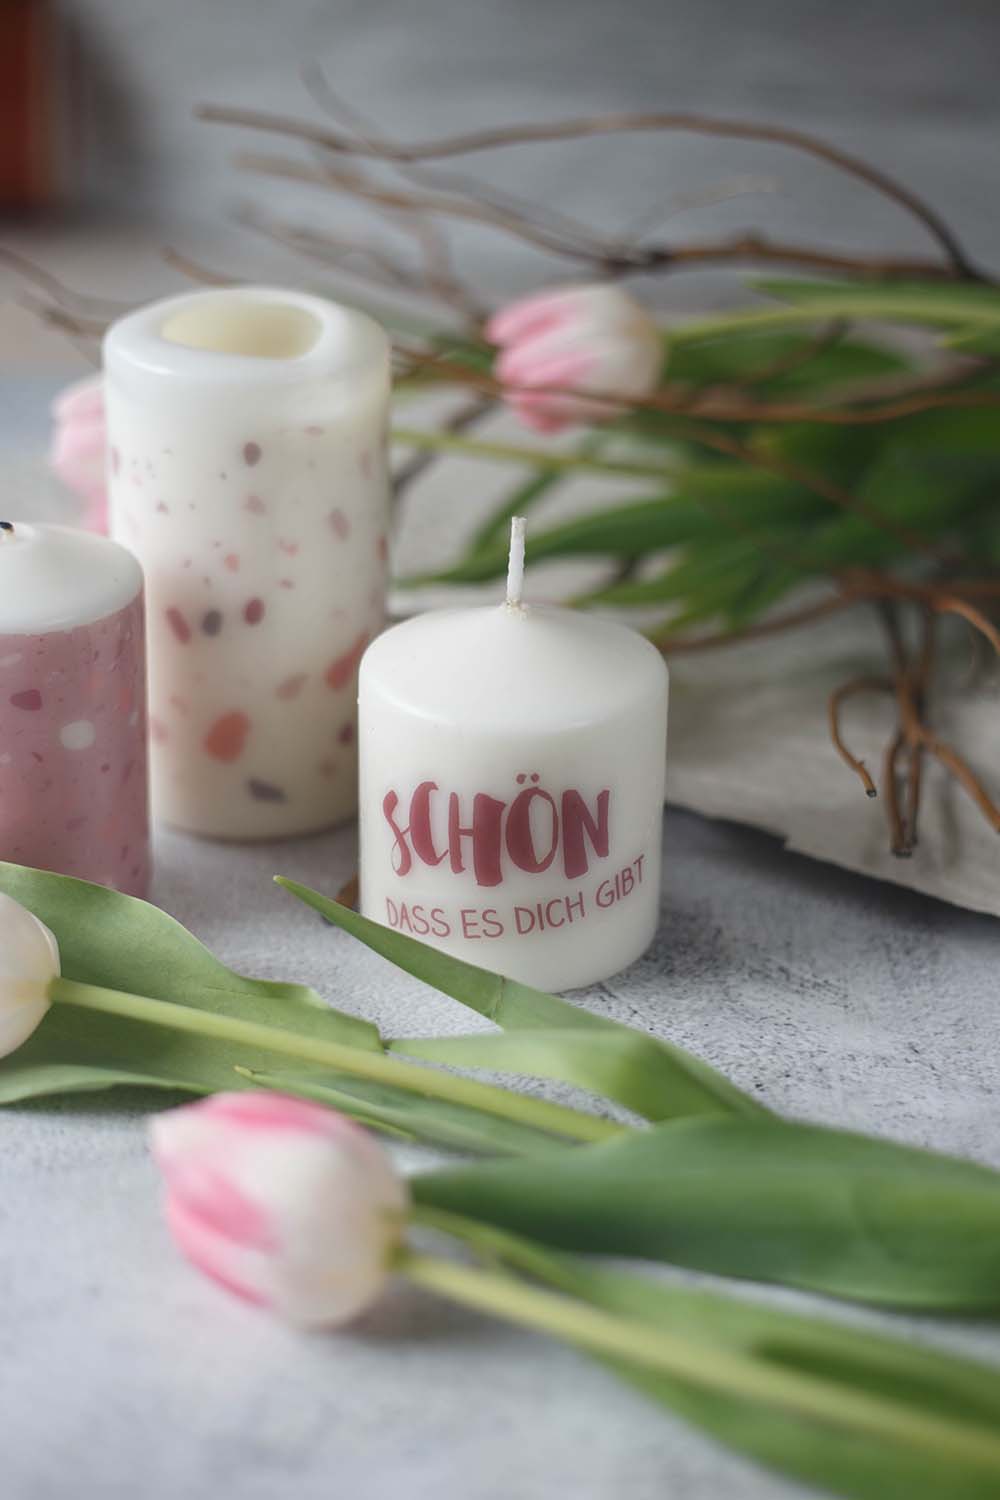
Today I will show you another idea with DIY candle tattoos: a cute gift set of pillar candles. I will show you how you can easily design the candles with water slide film and Transfer motifs and texts to candles can. This also works great with photos, by the way! You can then use the candles as a small gift, for example, or give them away for Mother’s Day.
Design DIY candles with water slide foil – make candle tattoos yourself – transfer texts to candles
Incidentally, I used the water slide film for the first time for my little DIY candles for christenings. I designed a small candle for each child and also designed our christening candle with the technique. You don’t need any complicated programs or technology for this – a writing program and an inkjet printer are enough.

Advertising note: The links to the products are affiliate links
Designing candles with water slide film – material – you need that
Also tools and materials
- inkjet printer
- Writing program on the PC (like Word)
- Scissors
- bowl of water
- soft cloth
That’s how it’s done – how to create candles with water slide film explained step by step

Here we explain step by step how you can transfer writings or motifs to candles. I have tried to explain all the steps as precisely as possible for beginners. If you are professionals, you can simply skip the corresponding points. You can also find the instructions as an Idea Pin in our Pinterest profile. We would be very happy if you follow us there and pin and save our ideas. You are also welcome to save one of the pictures from this article on Pinterest – so you will always find the idea when you are looking for a small gift.
Set design – Set design for candles yourself in Word – explained for beginners
If you are familiar with Photoshop and Co., this point is of course self-explanatory for you and you can simply continue reading the next step. You can also easily design a print file on a DIN A4 page in a writing program such as Word.
Transfer fonts and texts to candles
If you Transfer text to candles then simply google “free fonts”. You can then install the fonts on your computer and select them in Word. Then simply write the desired word in the desired size. For my candle I used the font shewdy (paid) and Claire Hand.
Tipp: In Word, you can show and hide the ruler and grid lines under View. So you can see directly how big your designs will be.
Danger – if you use transparent water slide film, your designs on the candle will be much lighter. It is therefore important not to use too pastel colors, but rather strong shades.
Transfer motifs, illustrations and photos to candles
If you transfer beautiful motifs to candles If you want, there are also many nice options. For example, you can simply drag images you’ve taken into Word and then scale them to the size you want.
Or you use designs from the internet. There are various sites that offer free illustrations. The Terrazzo Design is a chargeable design file that Maike has already used for our individual doormats. You can also find many beautiful design files on Etsy that you can buy for little money and then use over and over again. Simply enter the desired design plus file, eg eucalyptus file. There you can also customize designs with names. You can also drag these files to the desired size in Word.
Move your designs around the page to make the most of the page. However, there should be at least 3mm white space around each motif!
Print Design – Print settings for water slide film
Then it’s time to print. Put a piece of paper water slide film in the printer. It is important that the printer is on the shiny side of the paper prints. If you are not sure how your printer draws in the paper, you can first test print on normal printer paper. To do this, you simply make a small cross on the paper, put it in the printer so that the cross is on top and then print. When the paper comes out again, you know which side the cross landed on and you know which way round to put the paper in.
Be sure to select it in the print settings high quality and glossy photo paper. Then you can print out the design. Then let the paper dry for at least three minutes.
Apply layers of acrylic spray and cut out
For spraying, I always put the paper in a large shipping box. Works best outside. Apply the spray with sufficient distance in a thin layer. Then let it dry and apply two more coats.
Tip: On most acrylic sprays you will find application instructions for a good result, for example the spray distance and how long you should shake the spray beforehand. Be sure to follow these!
After the last layer you should definitely let the paper dry completely. This takes at least 15 minutes. You can test on a corner whether the paper is already dry. The surface should feel very smooth and silky. Then you can cut out the individual designs. Leave about 2 to 3 millimeters of space around the motif.
Soak and transfer design to candles
Now you can put the design in a bowl of water and let it soak for about 1 minute. Then you can place it where you want it and “slide off” the back – hence the name. As long as the design is wet you can still move it on the candle. With a soft cloth you can absorb the moisture and smooth the design.
let dry
The design is very shiny at first, but that changes as it dries. It is best to leave the candles alone for a few hours. After that, the design is fixed and you can wrap the gift!
Happy gift giving
Jutta
Maybe interesting too. . .:
Source: kreativfieber.de

