
Advertising
{Partner: POSCA // Information about advertising at mein fairy dust}
The #DIYYearChallenge, which I organize every month with Laura from trytrytry, continues! Today the topic is “Small thanks” – our motto for this month is about making a little gift idea that can be given away as a great thank you – for example for Mother’s Day, as a thank you for dog sitting or just because.
This time our monthly sponsor for the #DIYYearChallenge is POSCA. POSCA is a water-based acrylic marker that is suitable for all kinds of surfaces – making it the perfect DIY companion and great for all kinds of upcycling projects. I’m a big POSCA fan and really enjoy using the markers, they’re great opaque and there is a great selection of colors.
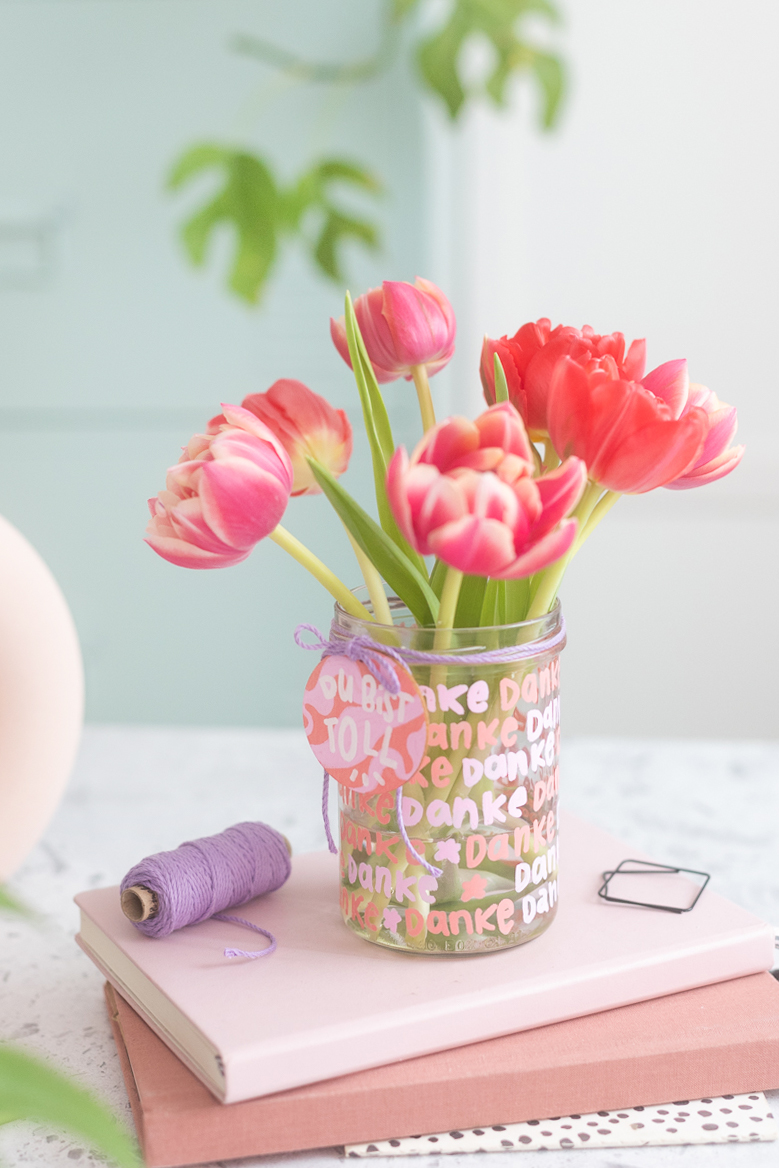
In keeping with our theme of “Little Thank You”, I made a small one out of a jam jar “Thank you” vase as a gift idea which I labeled “Thank you” with the POSCA markers. This is quick and easy to make and looks great.


ABOUT OUR SPONSOR POSCA
The POSCA markers are real all-rounders: POSCA is a water-based acrylic marker that you can use for all kinds of surfaces and projects. It provides really good coverage on (for example) glass, wood, metal, stone, paper, fabric and many other materials. For my project I got creative with it on glass and wood.
The 66 bright colors are opaque, matt and lightfast. There are also limitless design options thanks to the 9 different, high-quality tips made of acrylic or plastic.

The great The creative setwhich I used to get creative with my idea for the #DIYYearChallenge, is a very special set:
Because I’m part of it! This is so cool, I’m really excited about it.
Together with Laura (TryTryTry) and Mone (machsschoen) I was able to develop creative ideas and templates for this set. We have combined really beautiful POSCA colors so that the creative possibilities are limitless.
The set includes:
- 20 POSCA markers in selected colors
- 3 creative ideas with instructions and suitable templates
- a brochure with lots of tips and information about the markers
>> Click here for the creative set
I got creative with the colors from this creative set for my creative idea for the #DIYYearChallenge.


ABOUT THE DIYYEARCHALLENGE
Every month Laura from trytrytry and Lisa from meinfeenstaub take on a new DIY challenge on a given topic with the #DIYYearChallenge. Our monthly sponsor sends us the same material – and everyone comes up with a DIY idea using the same material – the community then votes on who wins and who implemented the topic better!
Every month you can win the DIY pack we got creative with by voting on Instagram for who wins. It’s definitely worth checking out Instagram because today you can win the big POSCA set.
There you can always find our ideas as a DIY video.

Now, of course, I’ll show you how you can easily make this pretty DIY vase yourself – you don’t need a lot of materials, it’s quick to make and you’ll have a great gift if you want to thank someone in a special way .


HOW TO DO IT: Make a DIY flower vase out of a jam jar as a small thank you gift
*The links are partner links. This means that I get a tiny commission on the purchase, and the price doesn’t change for you at all.

Step 1: Clean the glass
The first step is to clean the jam jar with glass cleaner. This is important so that there are no more grease stains on the glass when you paint on the glass with the POSCA markers, otherwise the edges will be imprecise. After cleaning, dry the jam jar well.

Step 2: Make marks on the glass
The next step is to take a ruler and measure the height of your jam jar. Now think about how large you want to write the “Thank you” font on the glass. I chose a height of 1.5cm, so I put marks 1.5cm apart along the glass.
You can also make the font larger or smaller.
I made the markings with the white POSCA marker – you can simply wipe it off with a cloth later.

Step 3: Label the glass
Now decide on two (or more) colors with which you would like to write “Thank you” on the glass. I use the colors “coral” and “light pink” here. I think the color combination is really beautiful.


Now write the word “Thank you” next to each other on the glass in pink and coral. If you’ve reached the first word all the way around and the distance isn’t quite right, you can simply paint a small symbol in between, for example a flower.
My advice: If you want to make the lettering extra durable, fix it with a water-based clear varnish after it has dried.

Step 4: Paint the wooden pendant
Now you paint the wooden pendant.
For the Painting with POSCA on wood I have an important tip for you: If you paint on untreated wood, the paint will soak into the wood and the lines can bleed/blur.
Therefore, you have two options for a beautiful design:
- Of Prime the wood with a clear varnish and only then paint it with the POSCA markers.
- Of First prime the wooden trailer area with a POSCA paint – when this is dry, you can work on it with another marker.
I chose option 2 and first primed the wooden pendant with the POSCA marker in coral. Let this dry.
You can then use a second marker to draw a pattern of your choice on it. I drew wavy lines on it with the POSCA marker in light pink.


Finally, I wrote “You are great” on the trailer with the white POSCA marker. I’m always amazed at how wonderfully the POSCA markers cover when you layer the colors.


Tie the pendant around the vase with colorful yarn – and your pretty little thank you is ready.

Do you like the DIY idea? Then take it to Pinterest with this picture and mark it on one of your pin boards:

I’m Lisa – and I can never sit still. I’ve been blogging about my passions on my fairy dust since 2013: These are great DIY ideas, chic design and very special illustrations. The main thing is homemade! More about me.
Source: meinfeenstaub.com

